Asset Guide
Everything you need to know to create, export, and share assets for Project Y. Whether you're making hair, clothes, accessories, or props — this is your reference.
File Specifications
All character assets must follow these exact specifications to work correctly in the layer system.
| Property | Value | Notes |
|---|---|---|
| Canvas size | 160 × 192 px | Every asset, no exceptions. This is Project Y's primary canvas size. |
| Format | PNG or GIF | PNG for static assets. GIF for animated (walk cycle, etc.). |
| Background | Transparent | No white, black, or solid backgrounds. Must show checkerboard in your editor. |
| Max file size | 50 KB | Pixel sprites compress well. If you're over 50KB something is wrong with the export. |
| Color depth | Any | Indexed or RGBA both work. Keep palettes consistent with existing assets for visual cohesion. |
| Grid | 8 × 8 px | Not required but recommended. All official assets use an 8px grid. |
Base Templates
Download these reference files to use as the bottom layer in your pixel editor. Draw your assets on a transparent layer above them, then hide/delete the base before exporting.
Layer Slot Guide
The character is built from stacked layers. Each layer slot has a specific purpose. Assets must be assigned to the correct slot or they won't stack in the right order.
Layer order from back to front:
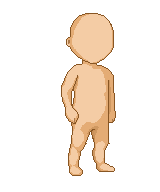
Asset Format
Each asset is a single front-facing image. Draw your clothing, hair, eyes, or accessories to match the idle/forward base mannequin pose. That's it — one drawing per asset.
Naming Conventions
Use clear, consistent names when uploading. The asset name is what users see in the dressing room and Wardrobe Commons.
# Format: slot_name_creator
# Examples:

top_black_hoodie_solen.png             # hoodie
hair_silver_spiky_missy.png            # hair style
hair_white_medium_forward_missy.png     # hair, front facing
hair_white_medium_side_missy.png        # hair, side profile
shoes_brown_boots_forward_solen.png     # shoes, front facing
accessory_black_mask_forward_missy.png  # mask accessory
When uploading through the dressing room or app, the asset name field is just the human-readable name (e.g. "Black Hoodie"). You don't need to follow the filename convention exactly — it's just good practice for keeping your files organized locally.
How to Export
These instructions apply to Shadow World Pixel Art App (swpapy.pages.dev) — the official Project Y pixel editor. The same principles apply to Aseprite or any other pixel art tool.
For a static asset (PNG):
1. Make sure ONLY your asset layer is visible
   (hide the mannequin reference layer)
2. Background must show checkerboard = transparent
3. Export → Export PNG → 1x scale
4. Confirm file is under 50KB
5. Open in any image viewer — should show transparent bg
How to Upload
You can upload assets from two places — the Dressing Room on the website, or directly from the Dressing Room in the app. Both sync to the same account.
From the website (dressing-room.html):
1. Log in at the top right → Launch App → sign in
2. Go to Dressing Room in the nav
3. Select the slot you want to upload to (e.g. Hair)
4. Scroll down to the Upload section
5. Fill in: asset name, tags (optional), public toggle
6. Choose your PNG or GIF file
7. Hit Upload
8. It appears in your slot immediately for preview
9. Select it → Save to App to sync to your companions
From the app (Settings → 👗 Dressing Room):
1. Open the app and go to Settings (⚙ gear icon)
2. Tap 👗 Dressing Room
3. Select your companion at the top
4. Scroll down to Upload Asset
5. Fill in: asset name, tags (optional), public toggle
6. Choose File → pick your PNG or GIF
7. Tap Upload
8. Select it from the dropdown to preview
9. Tap Save Outfit to apply
Once uploaded, your asset is saved to your account and available across all devices. If you set it to public, it will appear in The Wardrobe Commons for other users to add to their closets.
UAYOR License
UAYOR — Use At Your Own Risk. All assets shared publicly in The Wardrobe Commons are released under this community license.
- Anyone can use your public asset in their Project Y companions for free
- You keep full credit as the creator
- Assets are shared as-is — no guaranteed compatibility with all activity states
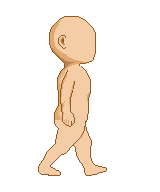
- If an asset only has a forward state, it may not display during walk or sit — that's okay
- You cannot sell assets submitted to The Wardrobe Commons
- You cannot claim ownership of assets made by others
- Assets with copyrighted characters or IP are not allowed
Private assets (not marked public) are only visible to you and never appear in The Wardrobe Commons. You can keep your companion's look entirely private if you prefer.
Project Y itself is not responsible for the content of community-submitted assets. If you encounter an asset that violates these terms, please report it.